Tech/Engineering

Oracle in-depth part 4: DTC deep dive

Nick Stachniak, Senior Solutions Architect, Databases

Druva’s DTC, or direct-to-cloud solution, which we discussed in the previous edition of this blog series, is a game changer in terms of its capabilities, its technological innovation, its novelty, and its utilitarian nature, grounded in elegant design and implementation simplicity. It leverages Oracle serial backup tape (SBT), which is a mainstay of Oracle backup and recovery technology and adds both technical innovation as well as an elegant and simple design. In this blog, we’ll look more closely at how this works and what makes Druva unique.

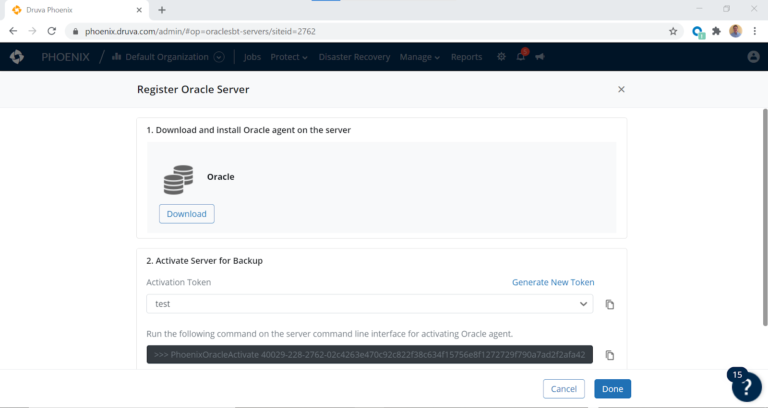
The ease with which Oracle direct-to-cloud can be deployed and leveraged is one of its greatest virtues. The simple download of an rpm file, followed by a quick secure copy (scp) of the file to your Oracle host allows any Oracle and Linux end-user to deploy it on their Oracle relational database hosts as the root super user. This of course necessitates collaboration between the systems administration group and your backup administrator(DBA).

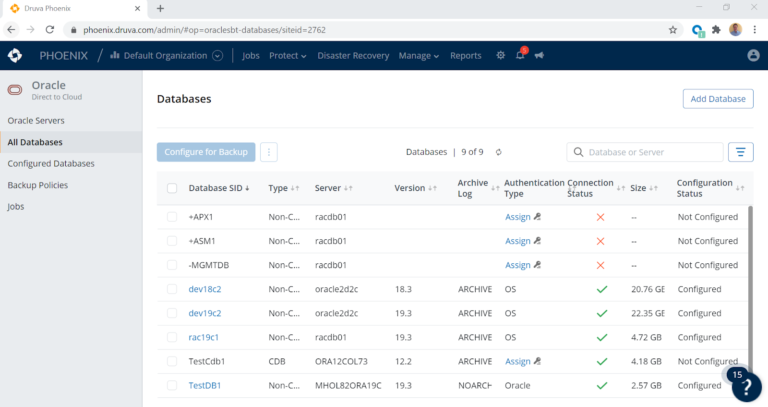
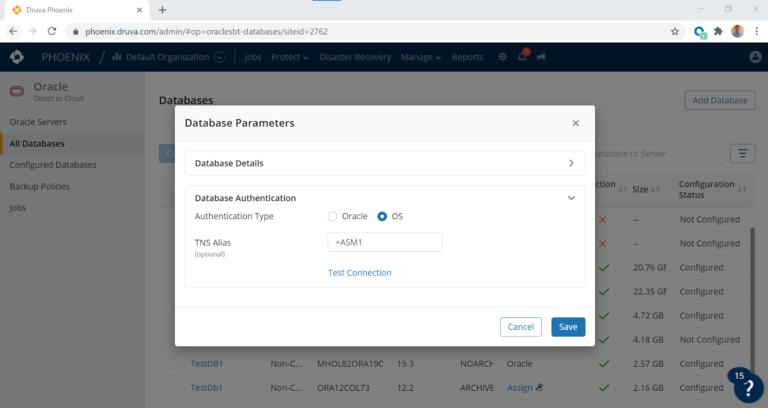
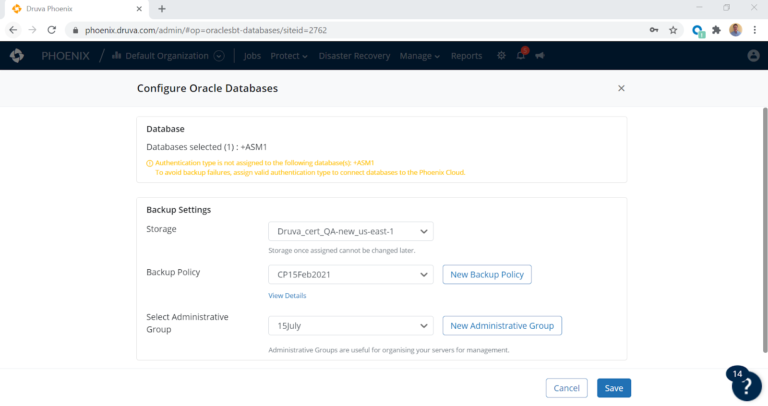
Once the rpm is deployed on the Oracle host, the installation process is very simple — it’s a standard rpm -ivh command to load it into the OS and start the agent. This new technology leverages a very lightweight agent that automatically discovers all Oracle databases on the server and affords the DBA team, or backup administrator, the ability to perform a few simple point and click operations in the UI. These include assigning highly secure and encrypted authentication mechanisms, as well as configuring the attendant database for backup.

Example on a triple node RAC cluster

[root@racdb01 ~]# rpm -ivh druva-phoenix-oracle-client-4.9.3-110108.x86_64.rpm

Preparing…                          ################################# [100%]

Updating / installing…

   1:druva-phoenix-oracle-client-4.9.3################################# [100%]

Starting PhoenixOracle (via systemctl):                    [  OK  ]

The process of starting and stopping the agent is very straightforward. The systemctl binary that all system administrators (SA) are familiar with is leveraged to stop, start, and/or status the agent. The deployment automatically starts the agent, and in order to execute the other commands, the following syntax is required.

Example of a start, stop, and or status command on node one of our RAC cluster

[root@racdb01 ~]# systemctl enable PhoenixOracle

[root@racdb01 ~]# systemctl start PhoenixOracle

[root@racdb01 ~]# systemctl status PhoenixOracle

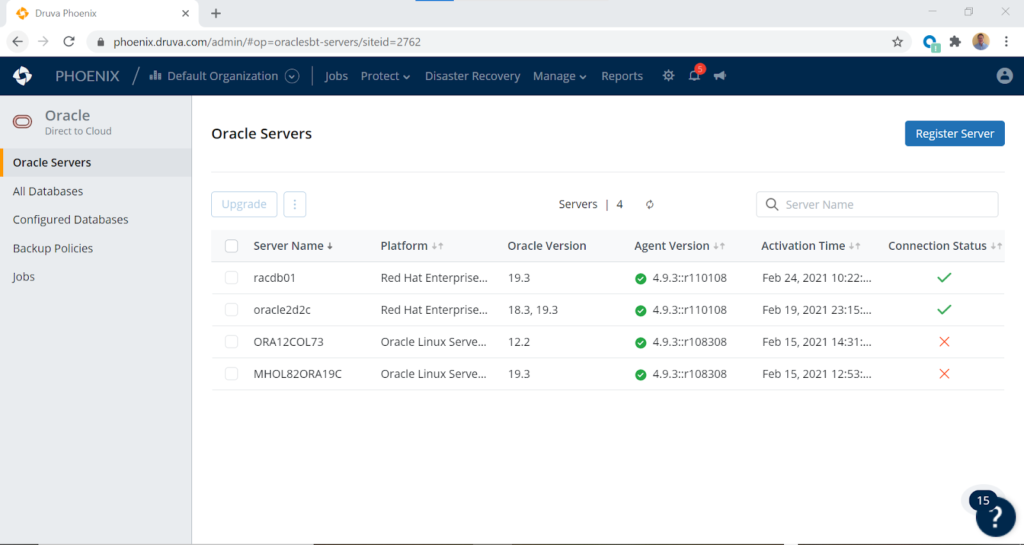
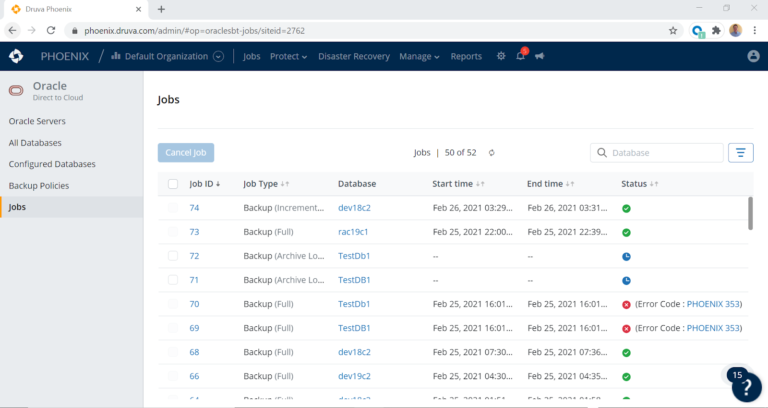
Druva’s GA release of the code will handle RAC clusters seamlessly by dealing with cluster node failures and performing RMAN backups across cluster nodes. This will load balance any backup activity and stream it in parallel. The EA release officially began in February 2021 and supports RAC as well. The administrator will only deploy the agent to one node only with the EA release. Hence, storage modalities like Oracle’s automatic storage management (ASM) are supported along with filesystem implementations of Oracle, or even single instance ASM deployments. The beauty and elegant simplicity of the agent’s deployment allow the agent to leverage a proprietary C library loaded onto the Oracle host.

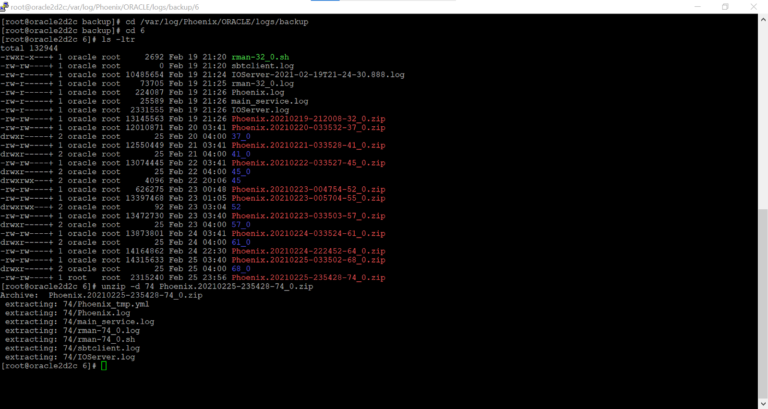
Example location of the library deployment and agent on Redhat 7

[root@racdb01 ~]# cat /etc/redhat-release

Red Hat Enterprise Linux Server release 7.7 (Maipo)

[root@racdb01 ~]# cd /opt/Druva/Phoenix

[root@racdb01 Phoenix]# ls -l *

bin:

total 61832

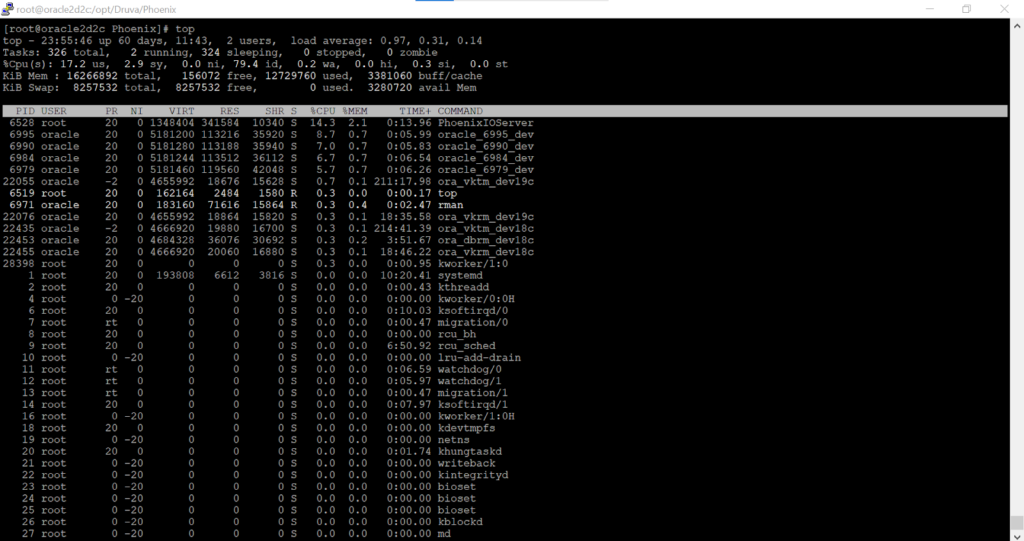
-rwxr-xr-x+ 1 root root 20162360 Feb 25 14:54 PhoenixIOServer

-rwxr-xr-x+ 1 root root 18174296 Feb 25 14:54 PhoenixOracle

-rwxr-xr-x+ 1 root root  9660200 Feb 25 14:54 PhoenixOracleActivate

-rwxr-xr-x+ 1 root root  5455144 Feb 25 14:54 PhoenixOracleSetProxyDetails

-rwxr-xr-x+ 1 root root  9853256 Feb 25 14:54 PhoenixOracleUpgrade

lib:

total 24736

-rwxr-xr-x+ 1 root root   114840 Feb 25 14:54 ca-certificates.crt

-rwxr-xr-x+ 1 root root 25209290 Feb 25 14:54 libphxsbt.so

[root@racdb01 Phoenix]#

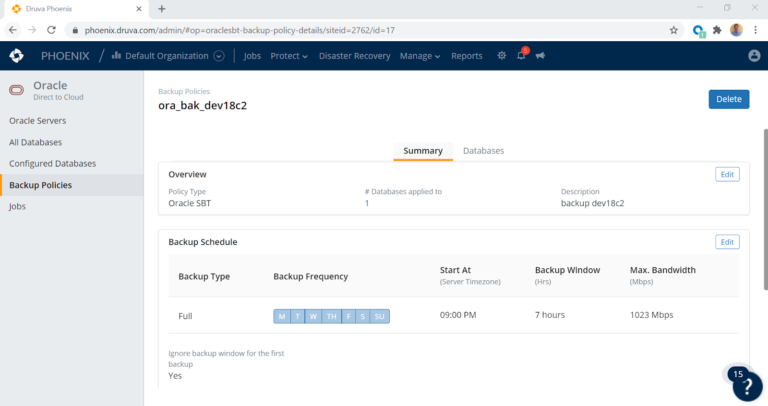
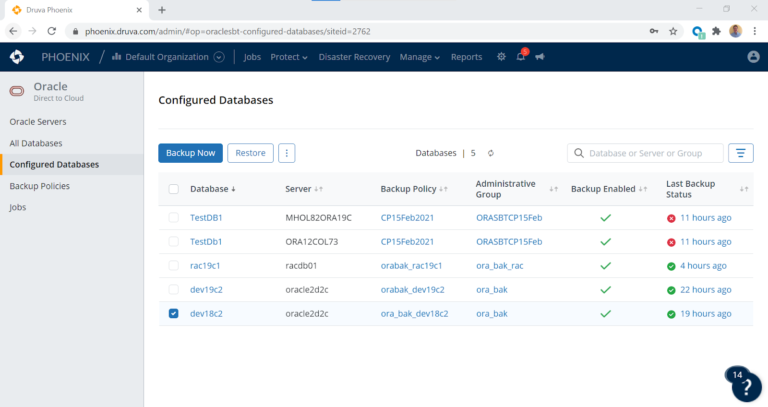
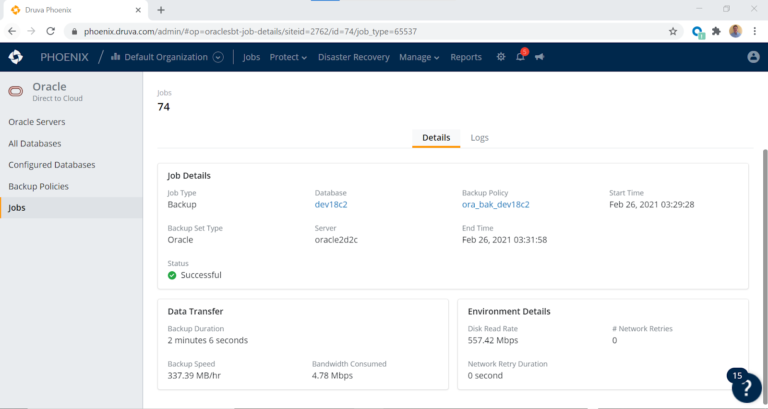
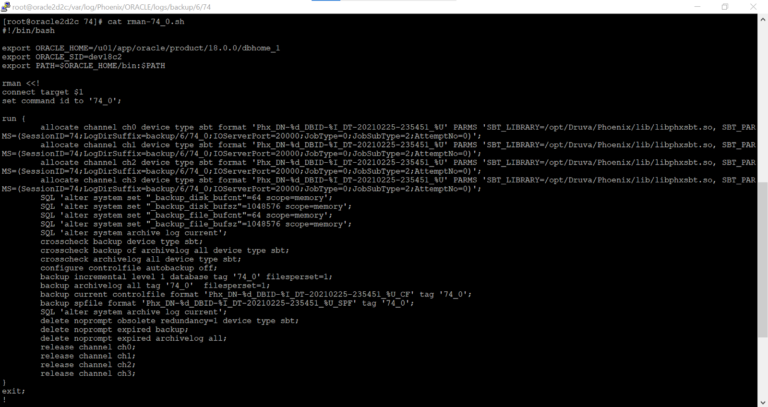
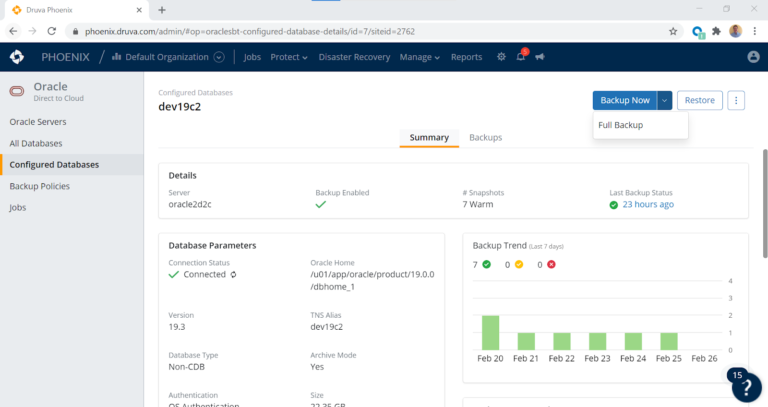
The Druva Phoenix for Oracle SBT tape library handles everything for the DBA and backup administrator. The library performs the deduplication, encryption, and compression of the RMAN-based backup. This greatly simplifies the backup process by removing any need for DBAs to worry about setting hard code RMAN parameters in their database configurations. The agent uses highly-secure certificates such that only the customer has access to their backups in the cloud. The SBT library directly streams Oracle RMAN backups into the Druva cloud and filesystem in the AWS EC2 environment. As such, the backups are not only compressed, encrypted, and deduplicated, they are also protected from any kind of ransomware attack. The backups transmitted to the Druva Cloud are encrypted in flight by the SBT library, and encrypted at rest in the Druva Cloud to ensure complete security and the integrity of your Oracle backup data. Once the SA, DBA, or backup administrator has completed the deployment of the agent and Druva proprietary code to the server, the rest of the work is done exclusively in the UI, including configuration of the databases. The UI makes this process simplistic with a short series of point and click operations.

A quick login operation to the Druva console is all that is required to set up the backups.

Setting up and navigating your DTC backup in the Druva console

Druva direct-to-cloud solution


Current customers will have great familiarity with the Druva console, but for those not yet introduced to the console, all that is required is that an administrator set up your username and password. Once in the console, the new UI of direct-to-cloud is revealed to the Oracle end-user or backup administrator.

In all instances, the first step for the end-user is to choose the appropriate organization in the console, and in this case, select the default organization under which our lab environment is set up. Simply click the drop down menu for ‘All Organizations,’ and select the default organization.

Example

Druva direct-to-cloud solution


The next step is to select the ‘Protect’ drop down in the center of the console, before selecting the Oracle menu and the direct-to-cloud option, to enter the DTC menu and set up your various Oracle databases for backup and recovery.

Druva direct-to-cloud solution


Initially, when this screen loads there will be no servers listed in the menu. The end-user will click the register server button to generate a token to activate the server with the agent. In our previous discussion, we illustrated how the SA or root super user will load the rpm and agent on to the Oracle host, which we are now ready to activate with the secure token from the console.

The end-user will click on the ‘Register Server’ button in the upper right hand corner of the console.

Druva direct-to-cloud solution

Next, click on the ‘Generate New Token’ icon and generate a new token by simply giving it a name. Copy the token to the clipboard and ultimately click done. The root super user will use this token to activate the server in the console and auto discover all databases through the agent.

Example on RAC cluster

[root@racdb01 Phoenix]# PhoenixOracleActivate 39992-228-2762-0e937bf698f90359e66b3049dd8c74f642c519c32460e8e2ee386cafba86c5fe

The command resides on one line and runs via the root super user with the Phoenix Oracle activate command. The activation will echo back whether or not it is successful. If the end-user sees that the server was activated successfully, they may then click on the all databases portion of the ‘Register Server’ page referenced in the UI. 

The ‘All Databases’ page below illustrates how you assign the various authentication privileges. If you focus on the +ASM1 instance, you will see a key icon and the word “Assign.” The UI is prompting the end-user to assign an authentication modality to the Oracle database through either a database authentication mechanism, or through OS authentication. In this example, I chose to use OS authentication. The fields are intuitive, simply click on the key icon and follow the prompts.

Druva direct-to-cloud solution

Example of assigning authentication 

Druva direct-to-cloud solution


The setup screen allows you to test the connection by simply putting in place a TNS alias for the specific database. On a successful connection test, simply click the save button. A failed test allows you to either address the OS authentication with the appropriate configuration or use database authentication. The choice is ultimately up to the end-user to select and resolve the authentication issues as they own the usernames and passwords in the database or on the OS of the Oracle host, SQLNET configuration, and any TNS aliases used to resolve the Oracle instance. Typically, this portion goes quite smoothly and the saved authentication configuration allows the backup administrator or the DBA to proceed to the next step — configuring the database for backup. Under the ‘All Databases’ menu, once the authentication is set, check the box of the database you want to configure for backup and follow the prompts for filling in the storage, etc. Choose a pre existing backup policy or set up a new one and do the same for the administrative group, and click save. 

Druva direct-to-cloud solution


Once a database has authentication assigned and is configured for backup, you may then back up the database by choosing ‘Backup Now,’ or waiting for a chosen backup policy to back up the database. All configured databases will show in the configured database page. The DBA selects the database to back up. This launches a backup job which can be viewed by choosing the ‘Jobs’ menu in the list. This shows all jobs that are running or the job history. In the case of this example, I chose to create a custom backup policy which sets up a schedule, a type of backup, and the RMAN configuration that runs attendant to the backup, like the number of channels, etc. The DTC product comes with a default backup policy that you may use for your backups, or use as a template to create further policies. However, you may also create your own custom policies by simply clicking on the ‘Create Policy’ button under the backup policies menu. In the example below, I navigate to the backup policy menu on the left and select the custom policy I created for dev18c2.

Example of backup policy

Druva direct-to-cloud solution


As you can see, the backup policy allows you to set up a schedule of how and when you will back up the database, as well as customized settings such as how much bandwidth to give the backup while it runs, when to run the backup, and what type of backup to execute — full, incremental, or archive log.

In our example, we now check the box for the dev18c2 database and run the backup. Once the backup starts, the progress is displayed in the jobs menu. The jobs page will provide the backup’s progress via percentage until it is completed.

Druva direct-to-cloud solution


The jobs page will display the running job, which is at 0% in this case.

Druva direct-to-cloud solution


We can see on the Oracle host that the backup is now running as the top utility. The server is running on the machine using CPU as it backs up the database.

Our putty window logged in as root shows us the process. Below is the putty window with this process displayed as PID 6528. This process does the work for streaming the backup data to the Druva Cloud, and is one of the unique features of the DTC backup method.

Druva direct-to-cloud solution


Upon completion, the console will show the backup completed successfully with a check mark. In this case, it was an incremental level one backup. 

Druva direct-to-cloud solution

By clicking under the job number, in this case 74, we can see the backup’s details.

Druva direct-to-cloud solution


This page shows the data transfer times, rates, and other details such as start time and end time.

If further granular details about the job are required for review, there are further logs created on the Oracle host in the logging destination of the Phoenix DTC product. This logging destination is shown here in our putty screenshot.

Druva direct-to-cloud solution


In the /var/log/Phoenix/ORACLE/logs/backup directory, we cd to the six directory and execute an unzip -d 74 based on the job ID to create a directory of the logs from the Phoenix backup .zip file in the directory. These will unzip to the number 74 sub directory where we may review them. The rman-74_0.log is a log of the backup activity and its success and progress. The command that the backup job executed is in the rman-74_0.sh file. This is executed against the database to back up the database with a level one incremental backup. This allows administrators to see the code that is being called from a proprietary JSON container database to allow the agent to create and execute backup operations with this information depending on the type of backup. This portion of the architecture is in the Druva Cloud, and is therefore completely secure as only the agent is able to communicate and interact with these proprietary components. The backup commands that exist in the rman-74_0.sh file are found in this directory.

Example of the script rman-74_0.sh

Druva direct-to-cloud solution


This displays a portion of the RMAN commands executed to back up the database. If in point of fact the DBA wishes to launch a full ad hoc backup of the database, this is possible by simply choosing ‘Full Backup’ under the ‘Backup Now’ button.

Once having done so, a full backup of the database will execute. In the next edition of this blog series, we will delve into more of the particulars to backup policies and how to leverage the power of DTC to customize your backup policies and strategy. We have now seen that it relies on a backup set modality as opposed to incremental merge. It also uses a mixture of level 0 full backups and differential incremental backups between each full. The backup policies are highly customizable, and the DBA may set up all full backups or a mixture of full and incremental, as well as archive log backups at chosen intervals.

Druva direct-to-cloud solution

Key takeaways

This novel implementation of RMAN as a backup and recovery tool allows the backup administrator or an SA to simply install, configure, and entirely implement a backup and recovery solution capable of backing up the entire Oracle RDBMS, archive log files, control files, and server-side parameter files and datafiles. It affords the end-user the ability to not only back up the complete set of database files, but also restore the database with a few point-and-click operations. We will cover that topic in our next segment of this blog series. We hope you enjoyed this introductory deep-dive into DTC, and how to install, set up, and configure the Druva agent to back up your Oracle relational databases! 

Download the Druva for Oracle solution brief to learn more about our innovative products for backing up and securing Oracle workloads.